MOVAVI has been around since 2004, and has been making awesome video editing and marketing tools. With 18 years in service, its products are used by millions in more than 200 countries around the world.
This review is aimed at studying the MOVAVI Video Suite, which includes a screen recorder, a video editor and a video converter as a combined offering.
| Pros | Cons |
| Combination of a 3-in-one program | Does not have advanced features |
| Competitive pricing | Incompatible with Apple M1 Silicon |
| Easy to understand and use | Cannot import custom objects |
| Motion tracking and picture in picture editing | Lack of options in color grading |
| Chroma editing | Expensive addons for different features and effects |
| Sleek and Stylish video editing interface | |
| Built-in online chat support for customers | |
| A number of import/export video options | |
| Ai Neural network improves video quality | |
| Pack of titles, effects and transitions gallery |
The ultimate goal for MOVAVI is to become the go-to video editor for newbies and professionals who can’t seem to understand other technical video editing programs. On paper, it looks great. But, does movavi actually have to take competition head on?
Creating outstanding videos isn’t an easy task as hours are poured in for editing. But movavi is set to change it by making its editing programs simple for anyone to use.
How much does MOVAVI Video Suite cost?
The MOVAVI video suite is a combination of 3 programs:
- Screen recorder
- Video editor
- Video converter
It comes at an unbeatable one-time payment of $79.99. Or if you want the video editor, you can settle in for just $59.99.
This is great considering the $99+ price tag for Adobe Elements and Cyberlink Video Director, not to mention the monthly subscription costs of Premiere Pro 2022. The most premium one-time license fee for Cyberlink Powerdirector Ultimate is a staggering $139, which does not come in a bundle, as compared to MOVAVI Video Suite.
What are the system requirements for MOVAVI Video Suite?
Here are the minimum system requirements for Video Suite 2022:
| Operating System | MS Windows 7/8/10, Mac OS |
| Processor | Intel, AMD, dual core 1.5 GHz |
| Graphics Card | NVIDIA GeForce, Intel HD Graphics 5000 |
| Resolution | 1280 x 720 |
| RAM | 4 GB |
| Hard Disk Space | 3 GB (For ongoing operations included) |
It took about 600 MB of space on our hard disk, which is higher than if you were to only install the Video Editor or Screen recorder.
Who is Movavi Video Editor 2022 good for?
Whether you’re a new or an expert user, these are the following applications where you can use Movavi Video Suite or Video Editor:
- Blogger with frequent use of screen recorder to capture and edit instructional videos
- Youtuber
- Facebook marketer
- Twitter expert
- Instagram Stories/Reels
- Teaching
- Family videos
- Studying and distance learning
Video Suite User Interface
Whenever you start the MOVAVI Video Suite, you are greeted with a welcome screen that highlights the various functions of the program as follows:
This makes it easier than ever for a new movavi video suite user to navigate the program, and understand how it works.
The first thing that really struck me for Movavi Video Editor Plus 2022 is the dark mode user interface, akin to what you’d get in Premiere Pro.
The best part I really liked about this program is its easy to use navigation interface. You can launch the screen recorder, convert a video or edit a new one all from the single dashboard as shown in this screenshot:
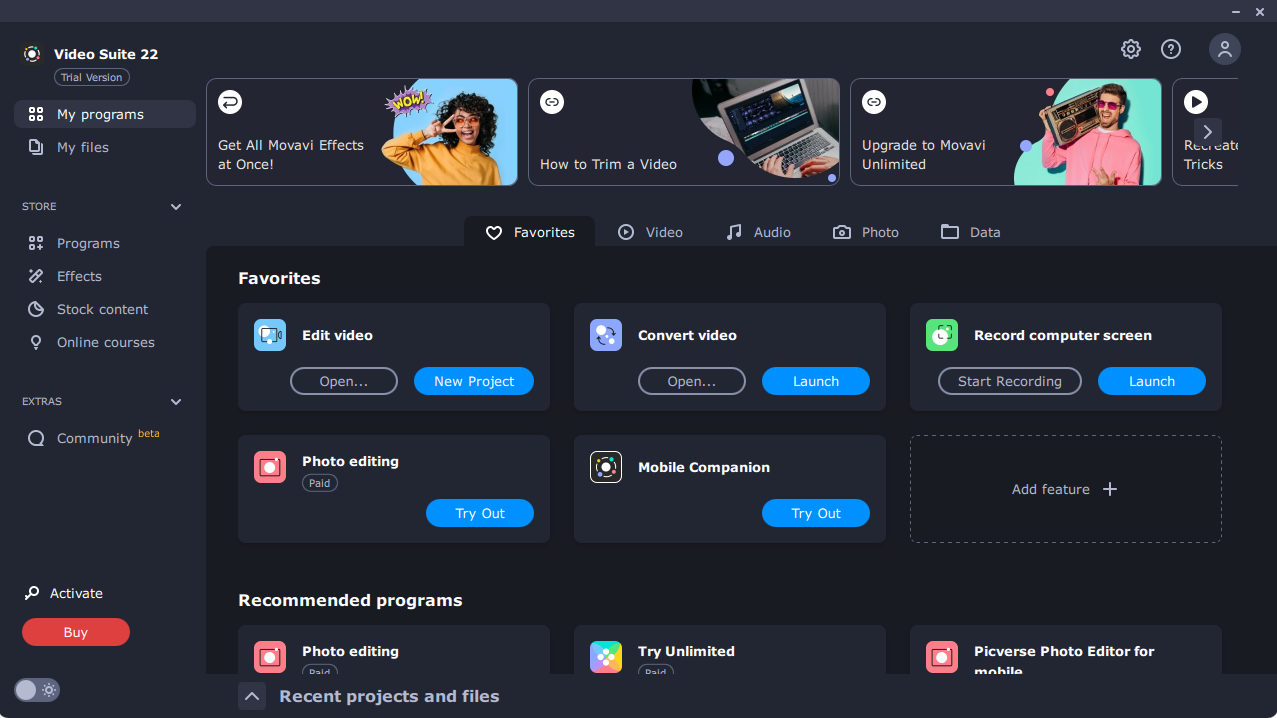
You can see promo material shown at the top with the option to upgrade, however there are helpful video tutorials on their youtube channel, played right in the application instead of directing you to the browser.
If you were to buy unlimited access to the Video Suite 2022 effects library, it would set you a whopping $129.95, a price tag that doesn’t really settle with me. If you are into basic editing, I am pretty sure that Video suite 2022 has a number of effects and features, albeit limited, to take off your video. There isn’t any need to buy any pack right now.
Let’s start off a new video project and create some HD videos with Movavi Software. Click the New Project under Edit Video and you will be greeted with the following screen for the first time:
You will be greeted with a tutorial to gain a quick understanding of the timelines, elements and the way all the features work. You can either watch or close it.
You will find numerous tracks with the option to add unlimited items in music, videos, and titles. Various elements are aligned spaciously and are easy to understand.
The audio and video remain synced while editing, which is a great plus point when you are editing large files and don’t want the audio/video to get desynced.
From this screen, you can either import a video file, start a video capture, record screen, record audio and even make a quick video by selecting video files.
The 2022 version has a new feature added, where you can resize the timeline. One another feature long missing was the ability to add projects to the timeline from the media library. Previous versions would directly import all video files to the timeline, but the Video Suite 2022 adds up files in the media library from where you can import your desired media directly to the timeline.
This is evident in the following screenshot. We imported two zoom recordings and they can be seen in the media bin:
Other than the Media Bin, there are pre-existing template for various categories such as Sounds, Music, Sample videos, Backgrounds and Effect Packages. These aren’t usually the highest quality of stock footage, but should get the job done for novice editors.
Just like you would use any industry leading video editing program, you have easily identifiable buttons to play/pause/stop the video preview. Other than this, you can use the keyboard shortcuts such as the spacebar to play/pause the video preview.
Once you import the files and if their aspect ratio is not the same as the actual aspect ratio of the project (set to default at 1080p), it will ask you through a popup.
To move to the next frame, press Ctrl+Right Arrow and similarly Ctrl + Left Arrow for backward. Here are some quick shortcuts that work for almost all industry leading programs:
- Rescale timeline – Mouse wheel + Ctrl
- Play/Pause – Spacebar
- In and Out – I and N
A great feature we liked was the ability to undo changes even after closing a project and reopening, something not any other video editing program does.
On the top left corner, you will find the following menu:
- Import
- Filters
- Transitions
- Stickers
- More Tools
All features are neatly organized making it easy for anyone to navigate and apply them. Let’s now get started reviewing these features.
Video Suite 2022 Features
It goes without saying that the ultimate purpose of a video editor is the ability to edit a video with all the bells and whistles. Gladly speaking, Video suite 2022 comes with all the basic required features that allow you to edit a video comfortably. Let’s explore them. Here are these in a nutshell:
- Inbuilt video stabilization
- Picture in Picture editing
- Chroma Key
- Vertical Video (Automatic adjustment based on the aspect ratio)
- Titles, Filters and Transitions
- Video Stylization
- Screen Recording
- Voiceover recording
- Automatic video clips generation from movie scenes
Whenever you import a video clip on to your timeline, you can easily edit and change the following:
- Color adjustments
- Size crop
- Pan and Zoom
- Overlay
- Split
You can find all these options when you right click a video and hover to Tools:
Filters
The second option on top right contains all types of filters that you can simply drag and drop on the timeline. These range from adjusting Noise, to Blur and editing color.
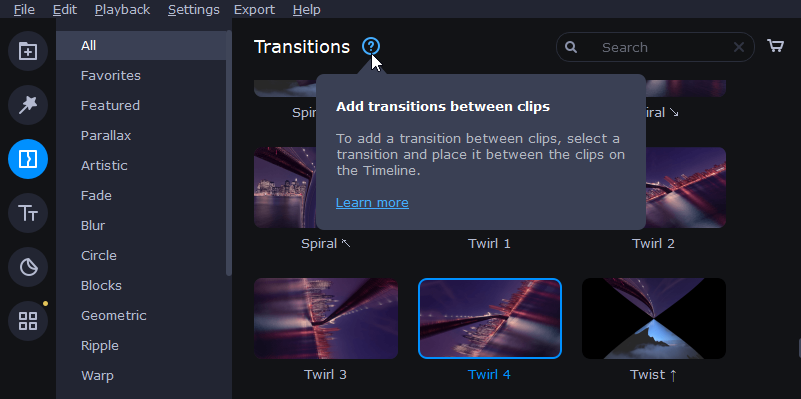
Transitions
Movavi supports a range of cool transitions to select from, all of which are free. Transitions take place in between scenes, and as is with every other feature, you get a short instruction on how to use them when hovering over the question mark.
To use transitions, all you have to do is drag and drop them in between the videos and they will appear here.
Titles
Titles allow you to add text with a number of sleek and stylish options to your video. Click Titles and you will be shown a screen with various options. Click and drag any effect and drop it on or in between the video as shown below:
You can change the text color, style, size and duration based on the given options.
Stickers – Object Animation
This is a library of free and basic animations like arrows, rectangles, etc. to let you do some animation whilst editing. When you click Stickers, you will find this library. You can then select and drag any sticker onto your video.
The process was really smooth and simple, allowing you to add animation in any one of your videos
More Tools – Advanced video editing features
The More Tools tab houses some of the most advanced, yet easy to use features in Movavi video editor. These are:
- Stabilization
- Animation
- Highlight and conceal
- Color adjustments
- Crop and Rotate
- Scene Detection
- Slow Motion
- Chroma Key and more
Let’s discuss the key features.
Video Stabilization
The video stabilization feature of Movavi Video Suite 2022 reduces visible camera shakes and stabilizes video using Artificial Intelligence. Our initial test results showed that the feature is indeed quite helpful, albeit only for footage with minor shakes.
Do not expect this feature to perform a highly professional job in stabilizing a video with extremely poor camera stability. You can also adjust the accuracy and shaking through the Advanced settings to apply the changes.
Animation
You can add custom animation to animate your objects such as titles and clips. You can select from the Easy or Advanced level of animation preset available. They are quite easy to use. Simply drag and drop on the timeline and you are all set. You can also adjust the duration for each animation as shown below:
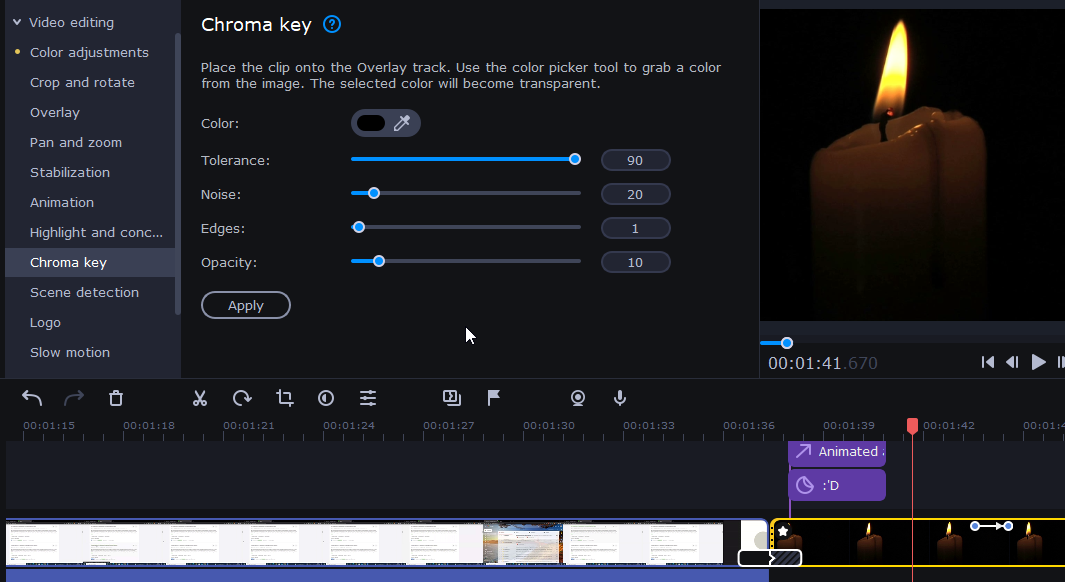
Chroma Key
What’s a video editor that cannot edit clips on a green screen? By default, green is the color for every chroma key, but you also have the option to use the color picker tool in Video Suite 2022 based on your video clip.
Movavi Video Editor vs. other video editing programs
Movavi vs Filmora
When it comes to the type of target audience, Filmora is perhaps the closest competitor to Movavi Video Editor. In terms of features such as audio/video effects, music, transitions and titles, both are more or less user-friendly and easy to use. We also noticed a striking resemblance in the layout and structure for both video editing software.
While Movavi Video Editor Plus costs $59.95, Filmora is priced at $79.99, which is on the higher side. Both video editing software are great and intended to be used by beginners or people that need an easy-to-use video editing tool.
Movavi vs Camtasia
Camtasia is on a whole different league as it caters with advanced options, specifically targeted to screen recording enthusiasts. Nonetheless, it is an excellent video editing tool on the market.
But if you’re just starting out and not looking to splurge $299 on a video editing tool, going with Movavi should be your preferred option.
Product Support
There is no point in purchasing a product that doesn’t come with after sales support. Movavi has amazing product support with all of the following:
- Extensive Knowledge base
- User tutorials
- Software activation
- Trial limitations
You can find everything from basic to advanced tutorials to shorten and improve your learning experience.
A great addition is the ability to interact with the customer support through live chat option, which unfortunately isn’t provided in a trial version. This certainly reduces your time of communicating through emails or ticket generation and can help in instantly solving any queries.